This transaction is used when you are registering New Vehicle into a customers name or to the dealership as a Demo. Remember that when registering a new vehicle, you don’t need to have a stock card created as when you send your transaction one will be saved for you automatically. It is also important to remember that if your customer does not have a current Queensland residential or business address, then you will need to list a Queensland Garaging Address as part of your transaction (see here for more information on how to do this). You should also remember that if registering a vehicle for a customer, that you should only process this up to 24 hours before delivery.
1.Open the Registration Transaction and enter the stock number you are wanting to register
2.Click off the field, or hit tab, if you have a mainframe download setup then the fields will prefill. If you don’t have a mainframe download setup, then you will have to enter the Vehicle identifiers manually (VIN/chassis number, engine, compliance and manufacture dates, colour, GVM, Tare, Seats)
3.Click on Lookup Model Assembly  and the list vehicle models window will open
4.Enter the make, model, body shape and build year and click on ‘send’, you will be returned a current make and model list from QT that matches the criteria you have entered
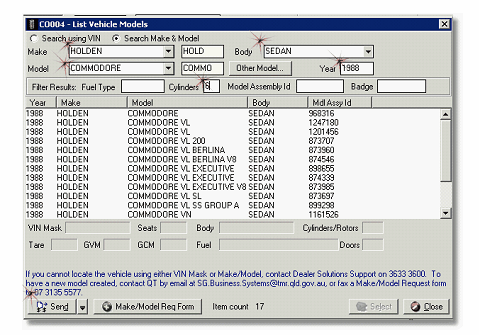
5.Confirm the model you have selected matches the Vehicle Inspection Sheet you have received, specifically look for a match on the seats, body shape, cylinders and fuel type (these are located under the main list). This is especially important with many new models coming out with variable fuel types but the same model type
6.Click select and your model will be inserted into your transaction
7.Click onto the plate tab
8.Select if you are using a stock plate (this will allocate automatically, however if you need to change the style, click ‘select’ and choose the appropriate style)or personalised plate (if using a personalised plate, you will need to also insert the plate details, as well as the plate owners CRN/s)
9.Select if using an interim label or printing a windscreen label
10.Click onto the Customer Tab
11.Select how you are making ownership selection from CRN or From Client Card (Remember that if you have a customers CRN, then it is not necessary to have a client card, simply select From CRN and enter the CRN, a client card will be saved for you as part of the transaction being sent)
12.Click on CRN1 Selection if you need to list a garaging address (see here for how to do this), or want to confirm if an organisation has a CRN (locate in QT database) (see here for how to do this)
13.Enter secondary customer information if there is a joint owner, registered operator or renewal paying agent.
14.Click on CRN2 selection if you need to confirm CRN information for this customer
15.Click on the Rego Detail tab
16.Select the Rego Production Class from the combination
17.Select the Purpose of use
18.Click on the pay term (this normally defaults to whatever is setup for your dealership)
19.Enter the Odometer reading (this needs to be what’s on the vehicle on the day of sale, located usually on your contract of sale)
20.Enter the Market value (needs to be the RRP of the vehicle as outlined by the manufacture including any fitted accessories)
21.Select if processing with a stamp duty exemption (remember that you need to have received adequate evidence) or tick the Govt s/d exemption applies
22.Select if your customer is claiming a registration concession (remember that you need to have received adequate evidence) and print the Concession application form
23.Click on the CTP tab
24.Select your CTP insurer, class and allocate a CTP policy
25.Select your customers preference for ITC (this needs to be given to you, don’t guess)
26.Click on Send
This will send your registration through to Trails and print the corresponding paperwork. Remember that your customer must sign either a letter of authority or the registration paperwork.
Retain a copy for TRAILS filing along with any concession documents, CRN applications and letter of authority if used. Remember that your customer’s signature must be on either the Letter of Authority OR the original paperwork. Please refer to page 70 for more information on Letters of Authority.